For What Its Worth
Bleeding Brakes with a Vacuum pump
Bleeding the air out of the brake
lines is often a problem. There are a few tricks to it. My
suggestions.
When installing new flared lines I like to "swedge" them in or make
sure there is a tight fit. Tighten them once, loosen them
and check that they seated all the way around and then tighten them
back up. look at the flare end closely and you should be able to
see where it seated. Be careful when you have a steel line going
into an aluminum block. The steel can scar the aluminum if over
tightened.
Bleeders. The valves that allow you to bleed the system. If
re-using old ones, make sure they are clean of dirt and freely let
fluid flow out. A small drill bit can be used, by hand, to chase
the hole down the center to get the gunk out. Some Teflon tape on
the threads will help seal the valves so they don't pull as much air
around the threads during the bleeding.
Once all the lines are in and test fitted you are ready to put in the
master cylinder with fluid. I bench bleed the master
cylinder. There should be instructions with the master cylinder
on how to do this. Careful, brake fluid eats paint and there will
be a few drips if bench bled.
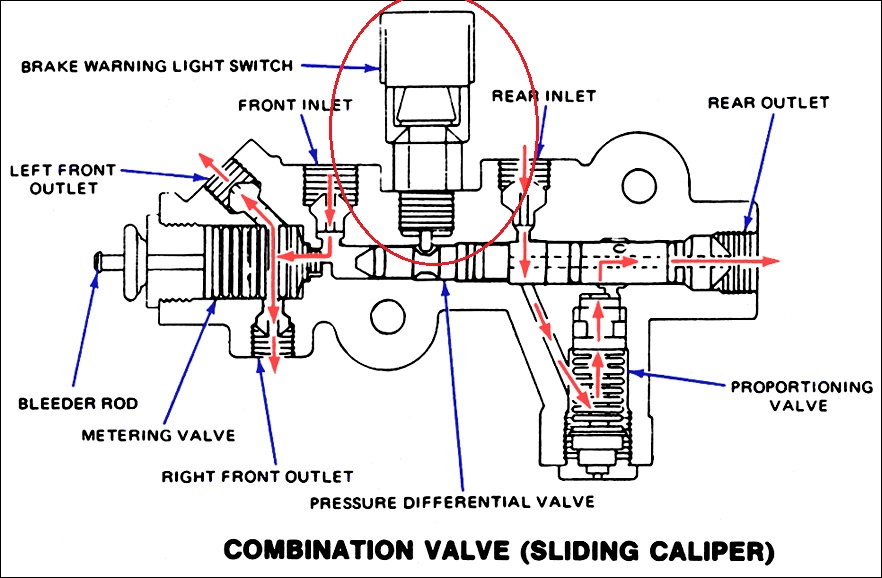
If your system has a junction block with a brake light warning switch you need to take extra precautions. The brake light switch is activated by a pressure differential valve. It is easy to activate this switch during bleeding when front/rear pressure drops and the other is high. The problem is this switch blocks the "low pressure" line to prevent fluid loss in an emergency. It doesn't go back easily either. See picture below. It usually takes a small rod and the opposite system without pressure to get it to go back. Problem is the brake system has to be opened up and you have to do bleeding again.
The old time fix is to take out the switch, circled in red, and put in a brake tool that holds the valve in place. The tool used to be easy to find. Today it may be harder to find, or you need to make one.
Note this picture shows a junction block with an internal pressure regulator for the rear brakes. Some times the pressure regulator is external to the junction block, on the line to the rear brakes.
Check master cylinder fluid level often during the bleeding
process. If fluid level drops to 0, you get to start again.
Put the lid on to keep the dust out, but don't tighten.
Bleeding with a hand vacuum tool.
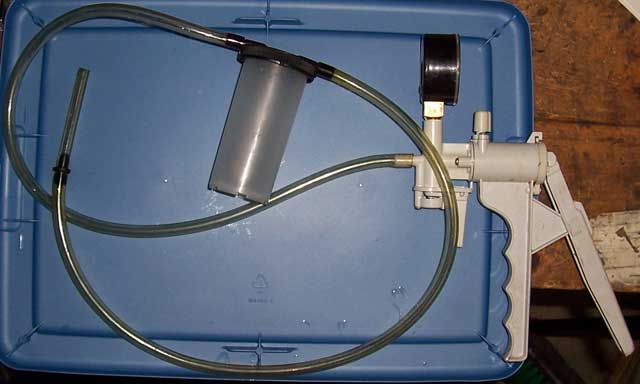
Put a box end wrench on
the bleeder and make sure you can open and close it without taking the
wrench off. Then connect the vacuum tool. The hose
should make an air tight fit on the end of the bleeder. Make
sure you have the catch cup in the line for catching the fluid,
pumping fluid through the pump is hard on it. With the
bleeder closed, pump down the vacuum. This is the trick.
Don't try to bleed with low vacuum, get as much vacuum as you can then
crack the bleeder loose. More than 15 on the vacuum gauge, 20 is
good. (My altitude is 400 ft. above sea level)
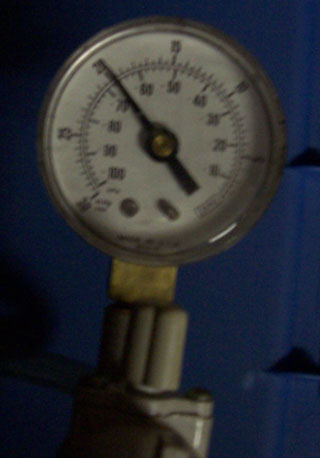
When the vacuum gage drops to low
vacuum, close the bleeder. Pump down and repeat as
needed. When there is air, the vacuum drops quickly. When just
fluid it drops slowly. You may still get air pulled around
the bleeder threads and see air bubbles in the bleeder line. This
is not a problem unless the bleeder leaks badly. When are you
done? I usually fill the small catch cup 1/2 to 3/4 full
for each wheel. It is more by experience than measure.
Don't try to re-use old fluid. New brake fluid is cheap.
Start at the rear, passenger side, then rear driver side, front
passenger and front driver. You may have to do this a
second time around when lines have been drained or replaced or just to
satisfy the worry nerve. The second time is a lot faster if
needed.
Test pedal, but first make sure lid is on master cylinder
tightly. With disc brakes you may have to push a few times
to set the pads. If the pedal feels good push and maintain
pressure for 30 seconds. Now check for leaks at any connection
you have opened or replaced.