For What Its Worth
Drum brake R&R
Prices from 2009
I redid
my
rear drum brakes. They would grab at
times. Previous owner had them checked
and they didn't find the problem. It
looks like drum brake knowledge has deteriorated. I
found
many
problems. Some info on redoing
drum brakes from my ancient experiences.
Watch
out for the
brake dust. It can be nasty stuff. I would wear a paper mask at least. If you vacuum the stuff up, be careful, since
the filters are not usually fine enough to catch the dust.
I recommend sweeping it up slowly. There is
always some dust on the drum and backing plate.
Backing plate
Make sure it is not bent. There should be three pads on the front and
rear where the brake shoes ride. They
may have little dimples in them. These
should be clean and a VERY LIGHT coat of white grease (Rated for
brakes) should
be used on them. You may have to
wire
brush or lightly file them to get rust off.
Same thing for the area between the stud and brake cylinders on
top
where the ends of the shoes ride. (See yellow box
below) If you
clean and paint the backing plate, be careful with the pads. They are sliding surfaces.
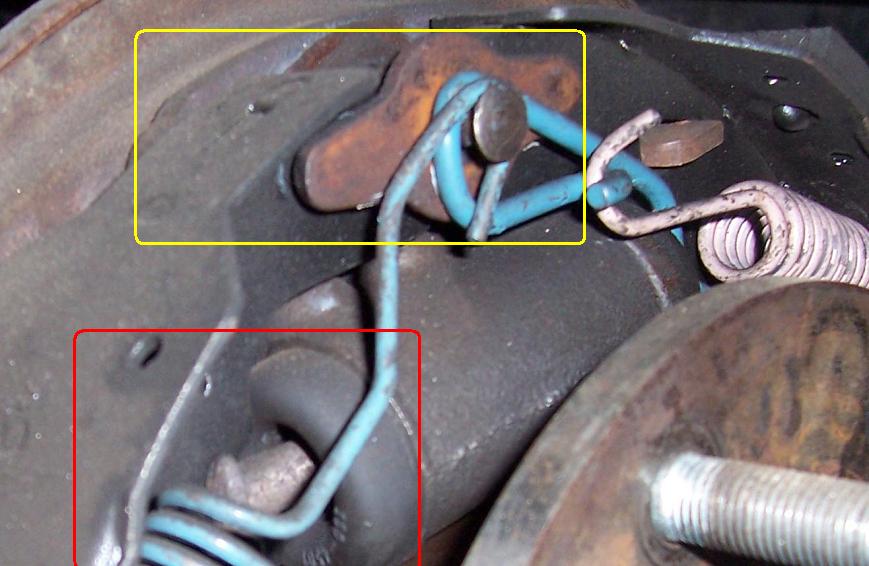
Brake cylinder pins
Make
sure the
pins coming out of the brake cylinders fit into the brake shoes well,
but not
tight. Make sure they are clean and
smooth in the slots and ends. Red box in Picture above.
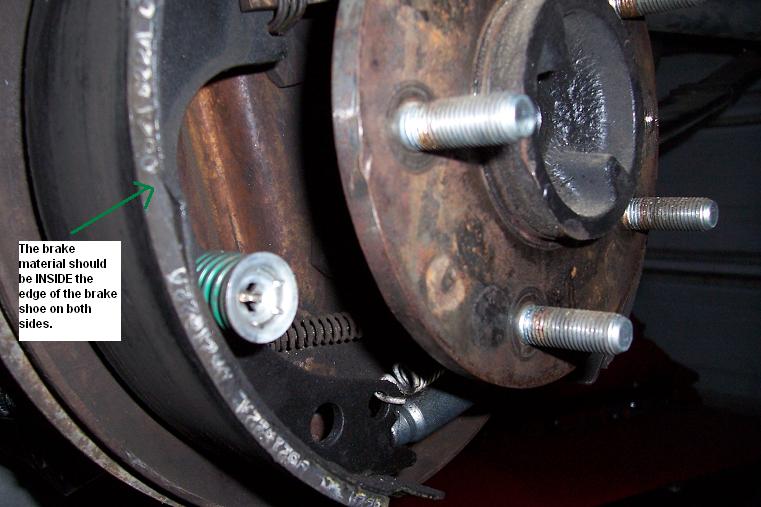
Brake Material no overlap
Make
sure the
brake material on the brake shoes DOES NOT overlap the brake shoes on
the
side. If it does, replace or return the
shoes. The metal edge is supposed to slide on the 3 pads not
brake
material.
Brake Cylinders
Don't
take
chances with old cylinders. Rebuild or
replace them. As my GM authorized mechanic teacher taught
me, don't try to re-use the brake cylinders as is, at least 1 out of 3 will
leak after you mess with the brakes. Make sure the new
cylinders are the correct ID size. Be
sure Left and right sides match in inside diameter size! If they don't match
one side will brake harder than the other.
Brake shoe quality
DO NOT
use cheap
brake shoes. Use good name brand shoes. The difference between the
cheap brand
and good Wagner shoes was $8 for 2 axles on my purchase this week.
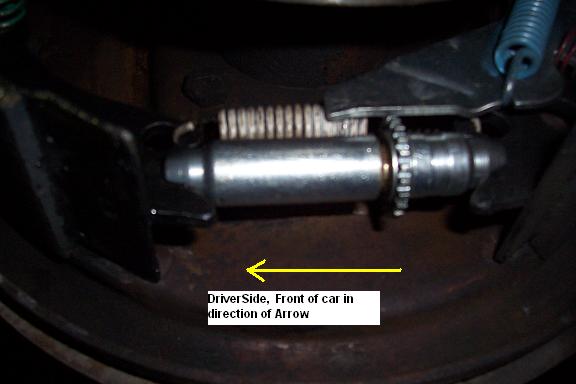
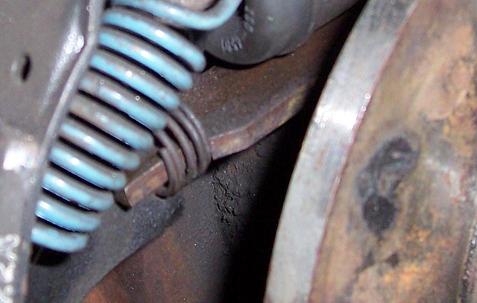
Drum brakes have adjusters at the bottom between the shoes. As the adjuster spreads, the shoes widen. An automatic adjuster is shown in this picture. Auto adjusters when working continually adjuster the brakes when stopping in reverse. Make sure the adjusters turn freely. If not take them apart, clean the threads and a light coat of brake/lithium grease. If that doesn't fix it, buy new ones. The Auto-adjuster arm should not have a groove or be rounded off where it meet the adjusting notches on the Auto Adjuster.
On older, manually adjusted brakes, the adjuster tabs are just a little taller than the spring, that is what holds the adjuster from moving. Manual adjustments needed to be done every 1500-2000 miles. It was a pain.
When
putting on
new shoes, make sure the adjuster is all the way in to begin with. Test
fit the
drums and adjust out as needed. Adjusters are directional, they
are designed for left and right sides. L/R threaded. When the adjuster arm
pushes down on the star wheel it should be opening the distance between
shoes. Reverse them and you have anti-adjusters. I have seen this
done in shops before and it is dangerous if not caught in time.
One shoe
will
have more brake material than the other.
The one with more goes to the REAR.
It is the one that stops against the stud when going forward and
takes
most of the wear.
Springs
If the
springs or
adjusters are rusty, replace them. It
may take 2 kits. A brake spring kit,
usually covers 2 axles, but you need to know front or back since the
keeper
pins are usually different lengths front/back. Front brakes are usually
wider. About $10 for a kit.
Also Automatic Adjuster kit, one for each
side. $8-10 each. A
little
white
lube on the pivot of the
adjuster. ONLY A LITTLE BIT.
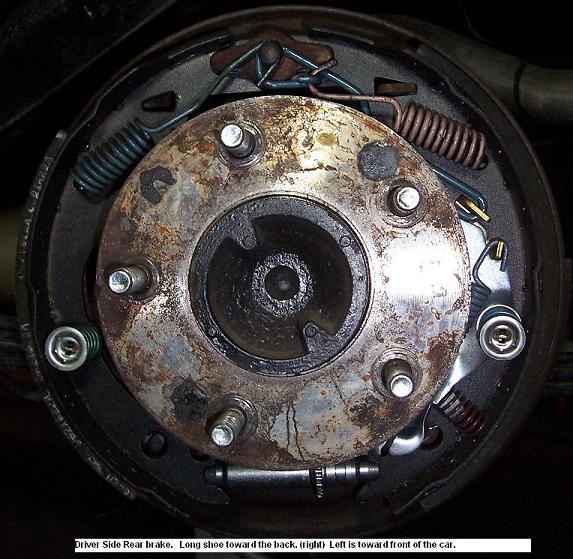
Take
care of the
spring on the bar that fits between the shoes.
This is for the emergency brake and this spring is not usually
in the
kits. The short one in this picture.
If you
can't
replace the springs, adjusters etc. from memory, only do 1 wheel at a
time. Use the other for reference.
Front to rear is similar.
Turn the
drums. ($6 each) If you have a good
brake shop, they should be able to "arc grind" the shoes to match the
drums after they are turned. This
eliminates the wear in period over the first few hundred miles. Warning, "arc grinding" of the
shoes may be a dead art.
By
turning the adjuster, adjust the shoes
to fit the drum to specs. NOT TOO
TIGHT. The drum should go on and turn,
but not have a lot of slop between the brakes shoes and the drum.
Make
sure the
drum does not drag on the backing plate.
What keeps the brake assembly centered? The Drum. If you push the pedal without the drum on, double check every thing is where it should be before putting the drum back on. Especially the top pins in the cylinder and the brake cylinder itself.
Once the drums are on and initial adjustment is finished, time to bleed the brake lines to get the air out. See Vacuum bleeding notes.
Final
adjustment
with Automatic Adjusters. When the
wheels are on, go backwards and use the brakes. Forward then back and
brake
etc. A few times. If
you
backup
slowly or use the brakes
lightly or not at all while backing up, you may not be keeping your
drum brakes
adjusted as they wear.
What was
the
difference in my rear brakes? It went
from using 3/4 of the distance on the emergency brake to 3 clicks.
This was on my 66. The springs, adjusters, shoes and cylinders were listed for a 72, the oldest the local parts houses books went. Same thing in this case. The front and rear brake flex lines were NOT the same as a 72, be careful.
When disc brakes first came out in the late 60's, shops charged MORE to service them. They even charged extra for alignment if you had disc brakes. It only lasted a few years until mechanics figured out how much easier disc brakes were to work with.