
The Lionel Mechanical E-Unit is a simple 3 way mechanical switch. Understanding how the unit works is important. I do my best to be accurate, but no guarantees. You are working with electricity. Safety concerns are not outlined here. If you aren't comfortable doing these tasks safely, send to a repair center.
First, Wiring an E Unit to a motor, usually the most asked question
This is the switch side of the E-unit, the back. The yellow arrow points to the switch connection to turn the E-unit On/Off. The switch connection could be on the Left or Right, depending on the E Unit. This one is on the right of this picture.
This is the side of the yellow arrow above. The wire from the coil is connected here to make the E-unit active when the switch is connected. Nothing else is connected here.

The post on the opposite side connects to the center rail wire. One wire from the coil connects here as shown. The power wire from the front of the E-unit goes here also, as shown. Light and smoke unit may also connect here to get the center rail power.

This is the front of the E-unit. Wire colors vary, so I am using numbers. Numbers follow details below.

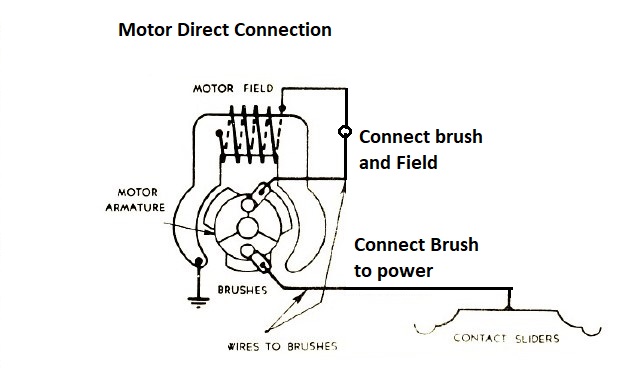
Standard Steam Engine motor. Yellow arrows are brush connections, Red arrow is the field connection, spliced into a wire from the windings.

Pulmor motor connection. Postwar Hudsons and Diesels. Yellow arrows show brush connection, red field connection.

I have found on some Pre-war and Postwar 0-4-0 switchers, the E-unit is wired differently. The wires above that show going to the brushes, go to both ends of the motor field winding. Then the wire that goes to the motor field above, goes to one brush and the other brush is grounded through a washer and bolt. It works just as well. In this case the field is switching polarity not the armature.
Details on the E-Unit function and wiring
Left and right in the description are based on the images below.
Wiring connections to the pullmor or universal motor. (4) in the diagram is the single wire from the "bottom" of the E-unit. It goes to one brush. The top of the E-unit has 3 wires. The middle wire (3) goes to the other brush. They can be switched since Forward/Reverse is just a position on the switch. On the top there are two outside wires. The black one (1) is for power. The other outside wire (2) goes to the field winding. (1) and (2) can be reversed also, but tradition is the black wire is center rail power in.
Current flow doesn't change in the Field winding. Current flow is reversed in the brushes as the E-unit cycles. This causes the Forward/Reverse rotation. The field is in series with the armature. Power flows through the armature and then through the field winding to ground.
Position 1 motor runs. Power runs from the pickup to the "left" of the drum,(1) to the "top left" armature brush (3), through the left armature brush through the armature winding and back out the "right" brush, back to the "right bottom" side of the drum(4) on to the field winding (2) and ground.

Position 2 In position 2, the bottom and top fingers make no electrical contact, interrupting the circuit. The engine is off or in neutral.

Position 3 Motor runs reverse direction to position 1. Similar to position 1, but the direction of power through the armature is reversed, while the field winding has the same power flow. This causes the motor to reverse direction.
Power runs from the pickup to the "left" of the drum,(1) to the "bottom left" armature brush (4), through the armature right brush to the armature winding and back out the "left" brush, back to the "right top" (3) side of the drum and on to the field winding (2) and ground.

E-unit including the plunger wiring.
Note how the power is also connected to the coil of the E-unit. also the E-unit switch enables the ground. There should be a little resistance to the E-unit switch. So it connects well.
The E-unit switch is connected to the ground or housing of the E-unit.

Diagnosing the E-unit vs. Motor.
To test a pullmor motor alone. Disconnect the 3 E-unit wires to the motor. Connect one brush, (4) wire to a power wire. Then a wire from the second brush (3) to the field winding (2). When power is applied, motor should run one direction. If not, further check motor brushes, armature and field winding.
Make sure the E-unit switch makes good contact when enabled. If loose or floppy, it may not connect well or cycle when there are vibrations on the track.
To test the E-unit fingers and connections. Disconnect the 3 E-unit wires to the motor. Only enough voltage to cause the E-unit to cycle is needed.
Connect a voltmeter to the bottom wire (4) and ground. Cycle power, the E-Unit should cycle. You should see full voltage and no voltage as you cycle the E-unit. Cycle at least 4 times. 2 no power minimum and at least 1 power. Repeat this test with Wire (3) middle top wire. Same thing.
Now connect an ohm meter/continuity tester between wires (2) and (3). Again cycle the E-unit 4 times. You should have continuity at least once. No continuity 2 times. Repeat for wires (4) and (2)
E unit repair
70% of the E-unit problems I have run into are fixed by proper cleaning, a good drum and good contact fingers.
What do I use for cleaning fluid? Mineral Spirits and cotton swabs. I use only a teaspoon amount at a time in little metal cups I have. A pint may last a lifetime. It burns so no smoking or open flames around, but you know that since you read all warnings on chemicals you buy, right. I think it is a little safer than the carbon-tetra chloride originally recommended in the service manuals. Make sure the cotton swab end is tight. Clean and then use a dry swab to clean off any excess.
E-unit tools
You can take an E-unit apart and re-assemble it without special tools, but I recommend having the E-unit tool to hold everything in place during re-assembly.
First tip, NO OIL on the e-unit
I have had to clean e-units that had been oiled. It attracts dirt and clogs them up. The plunger should move easily and cleanly. Clean off any rust on the plunger. Fine sandpaper to get it smooth if needed. If there is rust on the plunger, you need to check the barrel of the e-unit coil for debris and clean as needed.
The drum needs no oil. It should have a little drag so it doesn't move, but not hard to turn when assembled correctly.
Age causes problems
This is an example of an original, pre-war (82+ years old) E-unit. The wires were replaced, but the rest was original.
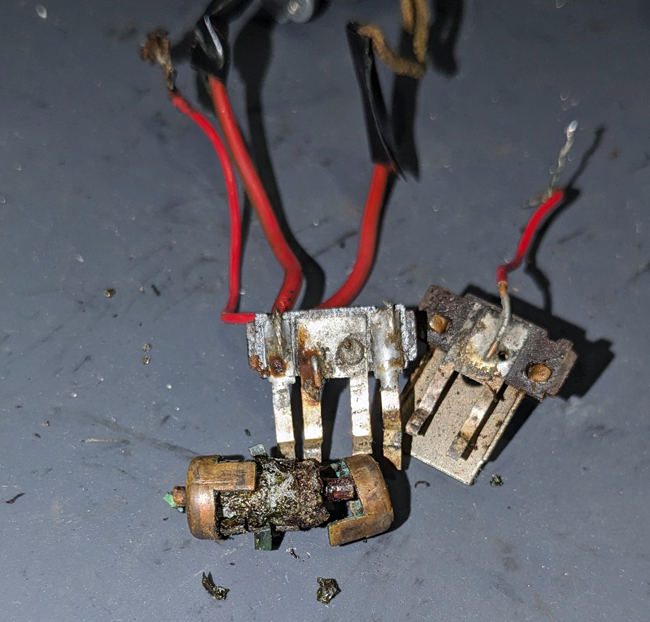
The primary enemy of the E-unit is age. Every pre-war, still original e-unit I have seen needed the drum replaced. The plastic had rotted or become so brittle the easily broke. Green corrosion on the contacts is the other problem. Contact cleaner may help, but be careful, the drum may not like it. If you tear the e-unit apart and replace the fingers, you want a new drum also.
Corrosion and time can also effect the tension on the contact fingers. I have had the tips of the fingers fall off from wear causing a flashing spark fireworks show as the engine went by. It lasted a few times around the track. After many attempts I have learned that in 95% of the cases the only way to fix the fingers is to replace them with new ones. Make sure the new fingers are all at the same "tension" or same alignment. You should not have to add tension to the fingers if they are level and aligned. Be careful, even a little bend the wrong way can cause loss of contact. The drum and E-unit design should add the proper tension.
Age is an enemy to the wiring insulation. Old plastic coated wiring has the insulation harden and crack off. The woven-cloth insulation fairs better, but may not be much better if disturbed.
Buzzing and noise from the E unit
For diesel engines, many like the buzzing as it adds to the Postwar "diesel" sound. This may be a problem for others. The buzzing is fundamentally caused by the 60Hz AC cycles causing the plunger to "buzz" and toy tolerances. I decided to investigate what causes the various "levels" of buzzing.
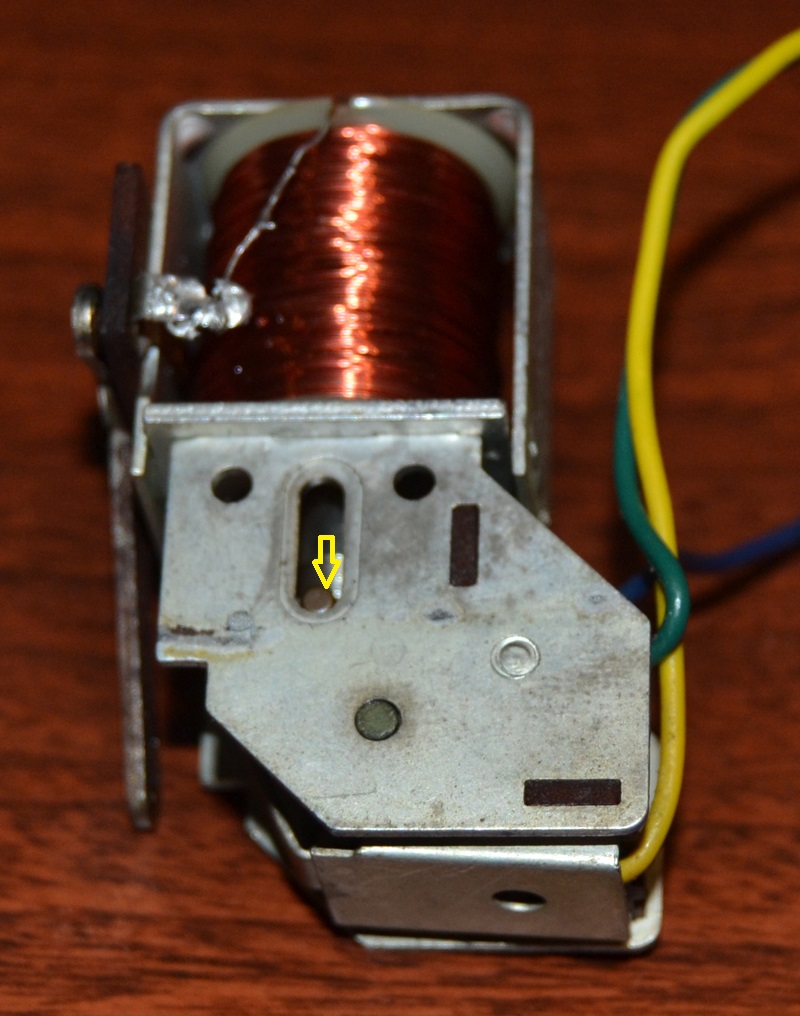
Here is the E-unit I tested. A particularly noisy one from a 616 switcher. The arrow shows the guide bar in the slot, in the down position.
I first tested how loud it was as is. Since I don't have a sound meter it was by ear. Noisy to begin with is 1X. I checked the unit. I found the coil on top had about a .02"/.5mm vertical play. It would vibrate a little when engaged. I tapped with 4oz/.1Kilo hammer on top to very carefully bend the top of the unit down to remove any play. Careful too much and there could be damage. This E-unit had a plastic core for winding the coil. This method worked to tighten it up. If a paper core, It may not work.
After tightening the top coil sound was about .8x, It helped some but not a lot.
Next many people recommend "straightening" out the pawl just a little bit. The pawl bend is shown by the yellow arrow in the picture.
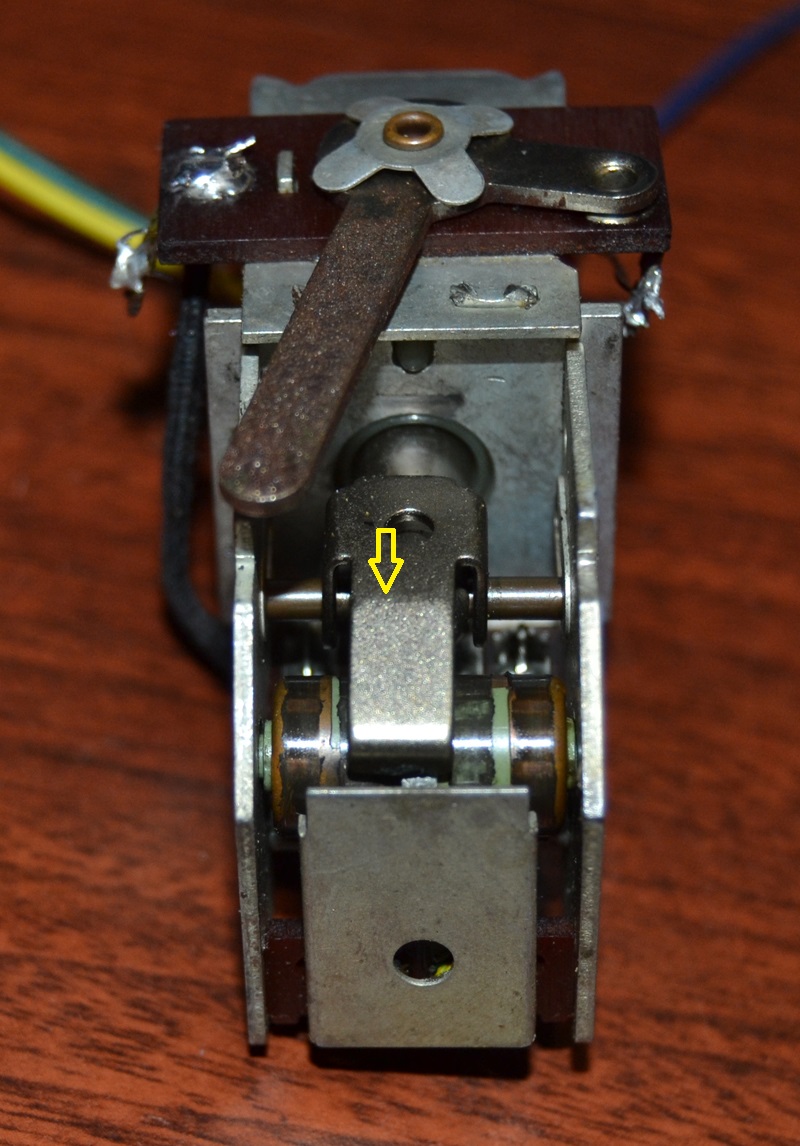
I straightened it so 1/2 the bend would be eliminated. Careful that you don't bend something else unintentionally. The sound was now about .2X. A big difference. Why did this work? It allowed the bar to seat at the top of the slots. See the yellow arrow below pointing to the bar.
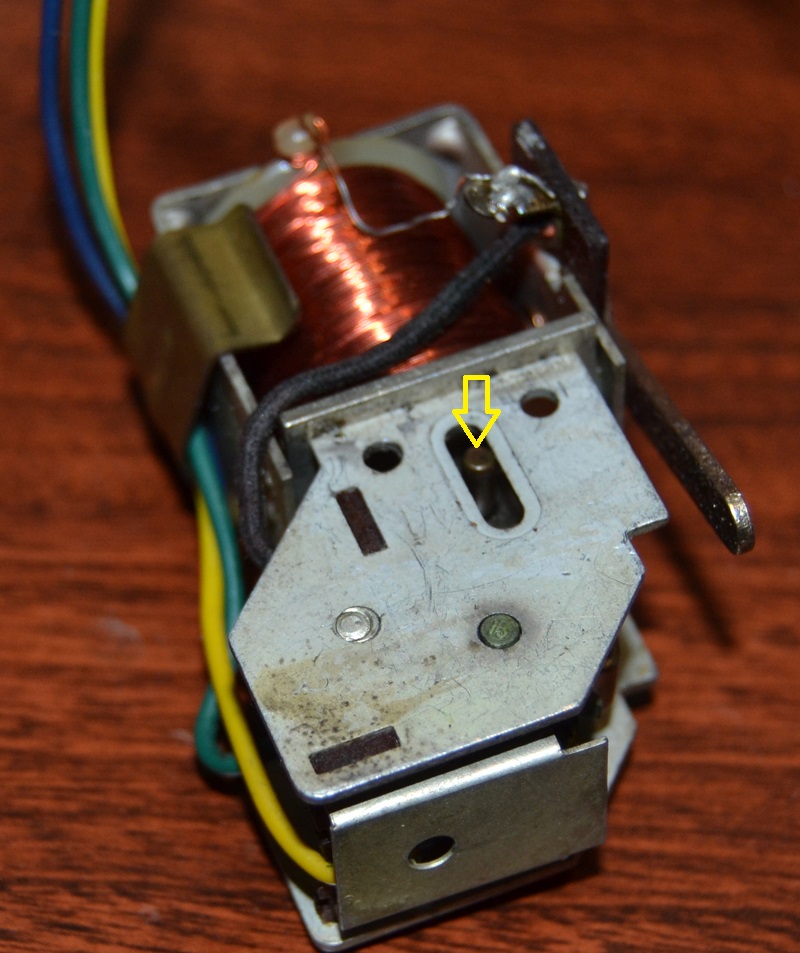
As the bend in the pawl increases, the bar is moved down from the top of the slot a small amount. The pawl acts as the stop, not the bar. This picture shows the "pawl" that may contact at top.

Flattening the bend allowed the bar to nest not the pawl. When the bars act as a stop, the unit is quieter. Grinding some material off the top of the pawl may help also. As long as the barrel still positions to set F/N/R, then bending the pawl is OK. It is the quickest fix when it works.
Some have glued rubber strips in the top of the slots, allowing the bars to nest. It does the same thing as long as the rubber strips don't wear out.
Some recommend putting a small, thin (about 1/32" .8mm thick) rubber bumper or nylon washer to the top of the plunger is a good method. I haven't tried it yet. From what I have seen, this lets the plunger seat at the top, not the pawl. And this would help reduce transmitting the vibration noise. Adding a spring may do similar, see Sticking Plunger below for details on a spring.Some use a small full wave bridge to convert power for the e-unit coil only to DC, no buzzing of the plunger since it remains constant magnetic direction. I have tested this and at high track voltage, the heat in the coil is excessive. It could damage the coil. I call this the grand kid and heavy load test. Overall I do not recommend it. Over time the plunger may magnetize causing it to stick also.
Sticking plunger
On Vertical E-units, gravity drops the plunger when power drops. Sometimes the plunger wont drop. First make sure there is nothing hanging it up. Are the plunger and coil barrel clean and smooth? Almost anything can cause it to hang up. NO OIL, oil attracts dirt and gets gummy over time. In stubborn cases with what appears residual magnetism, I have cut off 1/4 of the Horizontal E-unit spring and used the 1/4 spring to get the plunger to start dropping when power is off. Just to get past the stick point. Be careful if too much spring is used it may drop too quickly at low power when you don't want it to. This also tends to help the plunger seat when powered, reducing the noise.
Ed Horan adds the following from his experience with E-units, I
have tested this method and it worked for me also.
I have repaired quite a few E-units over the years. I thought residual magnetism was responsible for the plunger hanging up early on and used a demagnetizer. I had mixed results. A retired Lionel dealer told me to dis-assemble the E-unit and remove the plunger and polish the plunger until they shine. Then apply a coating of paste wax on the plunger, let it dry, buff and reinstall. I have learned Johnson's Paste wax is still used on plungers at a local solenoid company.
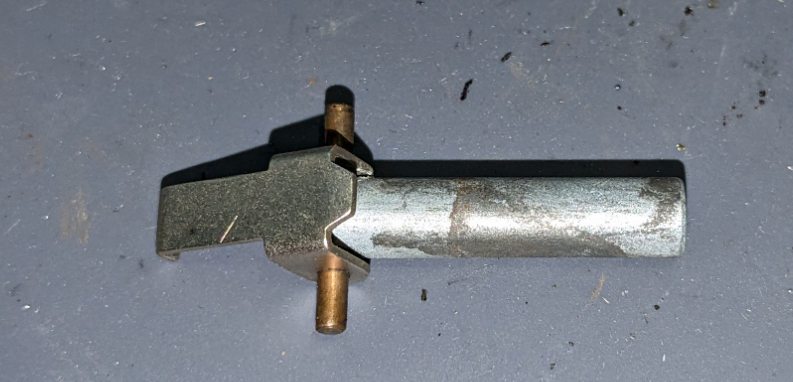
Most late prewar and early post war e-unit coils have a brass or stainless steel sleeve that the plunger rides in. I believe that time along with differences in the metal causes both the sleeve and the plunger to oxidize. The rougher surface causes the plunger to hang up in the sleeve when power is removed. I use Mothers brand chrome and mag wheel polish to clean the plunger and sleeve. The plunger will return to almost new condition and really shine. I apply Johnson's paste wax on the plunger, let it dry and give it a buff and reinstall. The units I've done work flawlessly and I've stopped using my demagnetizer. The trick is to get the plunger and bore clean and polished. E-units still work flawlessly years later.I've fixed some awful looking e-units, either oxidized or or just black with oil added by previous owners. A new drum and clean and polish will bring the unit back with just the cost of a drum and a little time.I agree with Ed's comments. This is an example of a plunger I took out of an 80 year old E-unit. The inside of the cylinder the plunger rode in was nice and shiny and smooth still. Looked like a good quality stainless steel. The plunger did not fair so well. Pictures as it came out of the E-unit. Surface is rough and discolored. Even Stainless steel will corrode in the right environment. This would not drop well as it needs to.
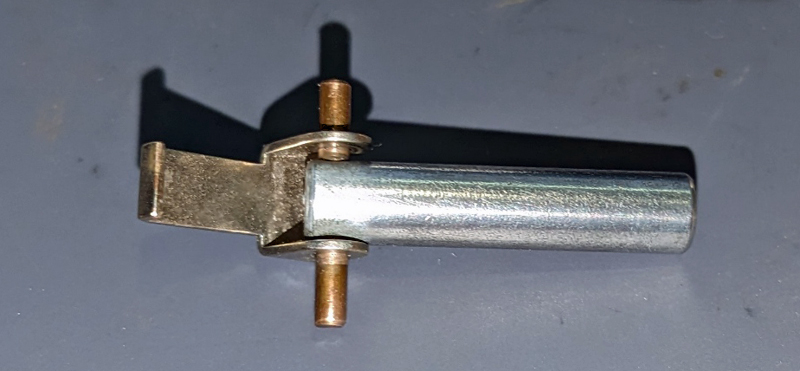
This is the same plunger after a 10 minute session with scotch bright. Glass smooth. Added some wax and polish. It drops like a rock consistently.
Funny stuff
I had one E-unit from an engine made in the 1950s. It was original but only worked in 1 direction. I tried everything to make it work forward and reverse. It never would. On inspecting the barrel in the E-unit it was slightly different than a standard Lionel one. I replaced the barrel and it worked correctly. A few months later I came across a service bulletin that warned of this. Lionel had received a batch of barrels that were not the Lionel parts, but the standard ones the supplier made for other things. The result was some engines had been made with the wrong piece in the E-unit. How many were made, it didn't say but it was caught at the factory before the complete order of incorrect barrels had been used. I was lucky enough to find one of them that made it to the customer. Maybe that is why I got such a good deal on the engine.
I did have an E-unit that interfered with the Horn/Bell DC so much it prevented the horn from working reliably. It would hum loudly and vibrate much more when the horn was applied. I had tried for hours working on the horn circuit to no avail. I found when the e-unit was dis-engaged, the horn worked flawlessly. With the e-unit engaged, it would not work. Even when a modern sound card was used, it had the same problem. I replaced the E-unit and the horn worked reliably with the e-unit engaged. The problem E-unit was very noisy, had a coil that was not held well vertically. The E-unit coils were wound randomly. Maybe there was something in this combination causing a counter feedback?
Spacers
I took a pre-war E-unit apart and found these .010"/.25mm spacers. They went between the drum and the E-unit. Some sort of plastic, almost like modern electrical tape but tougher. I haven't seen these before. Were these a factory fix for a loose drum, a later repair for a loose or sticky drum? I don't know. I removed them since they would interfere with the new drum.
![]()
Back to Main page.
Last update Jan 24 2026