Prusa Original Enclosure and options
I have built a Lack Enclosure and I also have an Original Prusa Enclosure. The lack enclosure was cheaper cost wise, but if you count your time and print time as valuable, it wasn't.
Gains of the enclosure as I see it.
Key comparison between Lack Enclosure and Prusa Enclosure.
These are the mods I used for the Original Prusa enclosure and
what I think their value is for printing and daily servicing of the
machine.
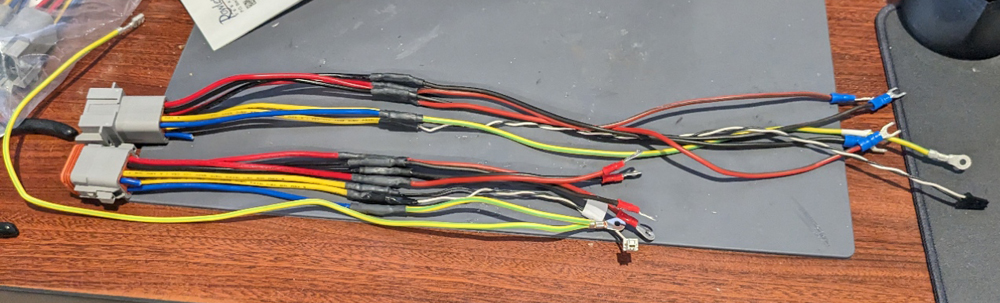
Remote mounting of the MK3/MK4 power supply High
A Prusa Option. Recommended to keep from overheating and causing
premature failure of the power supply. When I made this disconnect
the optional quick disconnect for the MK4 was not yet
available. A Duestch
8 pin connector with 16 AWG wire was used for this. Since water
resistance is not needed I removed the rubber gasket that is needed
for the water proofing. It makes unplugging it easier.
Example of the connectors wired into the MK4 power cable
Handles added to the Enclosure. Minor
Something to grab on to while moving the enclosure.
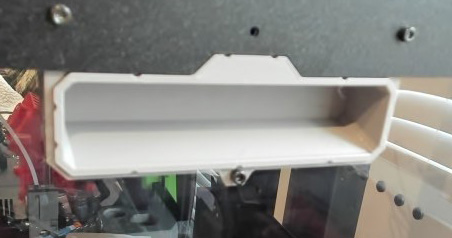
PTFE pass through in one enclosure handle Minor
This allowed me to put the MMU2S PTFE cables through the enclosure and manage the cables with the MMU2S in the horizontal position better. This picture is taken from the inside of the enclosure. Only 1 PTFE pneumatic fitting is needed on one side or the other. The 10mm fitting will let the 4mm OD tube pass all the way thru. I put mine on the inside, this prevents the PTFE tube being pulled into the enclosure more. I later found feeding the MMU thru the back was a better for me.

Converted the top to a lid on the enclosure. Medium
I moved the hinges to the side and had to drill 2 new holes in the enclosure for the hinges. The lid now opens sideways which is much easier than opening to the back, you need long arms for opening to the back if the enclosure is higher than waist high.

Plugging
the holes in the enclosure Medium
To warm up for Higher temperature printing, I sealed most of the holes in the enclosure. To prevent venting of most of the heat. I have a mod and many others do also for this. The enclosure will hold about 10-15C above ambient using the heat from the print bed. For PLA this extra heat is not needed. A door can be left open a little. The enclosure still assures a constant environment. Without the enclosure the draft from Heating or AC could effect the print. These were done in black PETG to match the enclosure.
I have also printed ASA in the enclosure and the higher temps needed are kept in the enclosure. My ASA prints have worked well.
Light option from Prusa.
I like the light, the only problem is I would like to mount it on top, not the side, but the cable is too short. I cut the wires, spliced in longer length and it now is mounted in the top-front.
Fan/filter option
The fan/filer option is to filter the air inside the enclosure only. Mainly for ASA, ABS and similar materials that vent undesired gasses. The filter is rated at 600 hours of use. I only turn it on when needed. for these materials.
Other useful options
Medium. LCD Disconnect for Printer. Makes taking the printer out of the enclosure for cleaning and maintenance easier.
High if enclosure is in a high traffic area. Guard enclosing the LCD control box. If you have a fan/light control mounted, just cut out the left side as needed. This is a very strong guard. There are now many other lighter guard options available.
Minor Cable management covers. Keeps wires covered and out of the way.
Back to My 3D PrintingLast Update Jan 2, 2026